FFV - Walkthrough - Finding The Last Crystal
| Enemies | Treasure | Blue Magic |
| Burn Ray, BlowFish, WhitWind |
 Since there aren't any new places to visit, you just have to search around looking for clues. New events only occur at two places: Tycoon Castle and Gorn Town. Head to the former first to get treated to a small cutscene.
When you arrive back at Tycoon, the Chancellor will invite you to stay the night. During the night Faris turns to Reina and tells her that the shock of nearly drowning when she was little made her forget all about here life as a princess, but seeing her sister made her remember everything. We then see Salsa as a child learning magic under the guidance of Jenica. Salsa goes to put baby Reina to sleep. She is told to come right back, but Salsa ends up telling baby Reina all about her up and coming ride on the dragon. She pulls the beds together, and ends up staying there with her sister. After the flashback, Reina suggests that it would be best not to tell the Chancellor about Faris' true identity. He would make her stay, since it is her duty, but they need to find King Tycoon first.
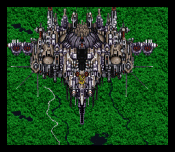
Once you've finished at Tycoon, fly the airship back to the Town of Gorn. When you near its location, the entire town, and whatever is under it, start to rise into the sky to become a giant, floating, castle! Rush back to the Airship Base to inform Cid and Mid about what you saw.
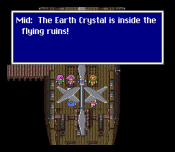
Cid and Mid aren't impressed -- they saw it all through their telescope. They then produce a book which tells of the mighty floating ruins. According to this book, the Earth Crystal is inside the ruins, powering it. The machine that uses the Crystal to float was turned off long ago, but somebody must have turned it on.  Reina and Faris quickly refute the idea that their father did it, but who else could it have been? Bartz wonders aloud how the team can reach this floating castle, and Cid answers right away. The answer is a mineral called Adamantite. Galuf recalls that some Adamantite was inside the meteor that he rode in on. Of you go to Tycoon Meteor!
Once you get there, Galuf opens it up. Head inside and collect the blue crystal at the rear of the chamber and a little fanfare plays. Just when you start to relax a little, four circles of energy appear and attack you...
| BOSS 14: Adamantaim | Level | 20-21 |
|
This boss fight is just like the Clay Claw fight in that you should take advatage of the boss' weakness: ice. Since the boss has a really strong physical defense, focus on a magical offense.
Adamantaim only uses strong physical attacks, so equip accordingly. Also, the boss almost always hits twice in a row, and he has the Charge attack. You've seen this kind of boss before so it should be an easy fight. Of course, you can just kill the silly turtle instantly with L5 Doom! You can steal a Hard Body from the boss, and you should win yet another Turtle Shell from this fight. |
||
Don't worry about the teleporter as it doesn't work yet. Head back to the Airship Base, and have the master engineers install the Adamantite into the airship. They meet you at the deck and go below to install it. Several thousand Cids and Mids get the job done. They pronounce their job done to an astonished party, and tell you how to operate the new craft. They also warn of the dangers associated with the Floating Ruins: you have to beat all of the cannons to get aboard. The team shrugs the warning aside.
Make a camp next to Rikks Village as the Inn here is free and you can buy LgtningSkills here. The upcoming fights are tough, so you want to prepare. May I suggest a party of a Sorcerer, a Ninja, a Time Mage, and a Summoner. Have the White ability on two of the characters and the Learning ability on the other two. Get every one suited up with their best armors and accessories, rest at the Inn, buy about 10 LgtningSkills, head to the airship, and save.
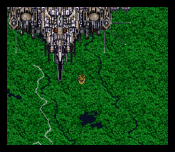
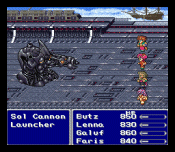
When you're ready, get on the airship and press 'X', and then hit up to confront the Floating Ruins. Don't worry about the explosions happening all around you as they can't hurt you. The guns to the left and right of the Ruins can however. To initiate a battle with one of the four mini cannons, just run into them.
| BOSS 15: Flame Throwers (4), Missle Launcers (4) | Level | 20-21 |
|
These guns make up the four fights that preceed the final boss fight that you must win in order to get in to the Ruins. There are two fights on each side of the Ruins, each fight consisting of two of either the Flame Throwers or the Rocket Launchers.
For these first four fights, use those LgtningSkills twice and that's all that it takes because of their weakness to bolt. The Flame Throwers use the Burn Ray Blue Magic almost all the time, so learning it shouldn't be all that hard. The Rocket Launchers are a little bit harder because they use the Missle Blue Magic almost all of the time. If you missed this magic in the Fire Ship, then you can't miss it here. Remember that after each fight you have the option of retreating to rest up at Rikks' Inn. To do this simply guide the airship to the bottom of the screen. After each fight you may win a Hard Body or a Speed Drink. Once you defeat all eight mini cannons, the big gun comes out! |
||
| BOSS 16: Soul Gun | Level | 20-21 |
This fight is the toughest you've faced so far, and is probably the hardest on world one. The Soul Gun uses Missle a lot. This will not only weaken you considerably, but also turn you old so your attacks won't be as strong. The constant missle bombings will also tenderise you for the Soul Gun's main attack: a super stong laser that attacks all of your characters. This attack not only hurts a lot, but will continue to drain your HP for a little bit! You will see the Gun preparing for this attack, and the frequency by which it uses this attack is based on the battle speed.
 To defend yourself, start by casting the Speed Time Magic which will give you a little more time between the main cannon firings. You can also use the Time Mage to cast Slow and Haste on the boss and your main offensive characters respectively. Use the White Mage to cast Protes to cut down the damage of the Soul Gun's main attack. To defend yourself, start by casting the Speed Time Magic which will give you a little more time between the main cannon firings. You can also use the Time Mage to cast Slow and Haste on the boss and your main offensive characters respectively. Use the White Mage to cast Protes to cut down the damage of the Soul Gun's main attack.
Know that this boss has two target areas: the Launcer and the Soul Gun itself. The entire thing is weak against bolt, so have your Ninja throw those LgtningSkils the entire time, and have your Sorcerer attack with the Bolt2 Sword. If you're speedy enough, you can stun the Soul Gun before it can start protecting its Launcher (you'll see some explosions). If you're super confident, you can steal Ethers from the Launchers and an Elixir from the Soul Gun. Don't forget about about Ramuh as he will cause some damage too. If the Soul Gun gets the upper hand, just keep healing everybody with Cure2 as that's all you can do. If you die keep at it! When the Soul Gun explodes you get a whopping 10 experience points. You also get a Dark Matter and two Potions. The hole left where the gun was is the entrance to the Ruins, so pilot the airship inside. You can just use L5 Doom on the Soul Gun to kill it right away, but that's cheating! |
||
Floating (Ronka) Ruins
| Enemies | Treasure | Blue Magic |
| StonedMask (B), Lamia (I), Fan Wizard, La Mage, RonkaKnigt, Archeotoad (I), Hyudra | Gold Armor, Elixir, Phoenix Down, Gold Shield, Potion, 5000gp, Shuriken, AncientSword, Moonring, Power Wrist, Cottage, Ether |
Before trying to tackle the maze of the Ruins, let's go over some of the things you should know about the monsters here. You should beware of the Lamia because it can confuse you very easily and it can use the Blow Fish Blue Magic which can kill you outright at this point in the game (it causes 1000 points of damamge every time). To learn the Blow Fish magic, make sure that you resurrect the targeted character before you kill the Lamia, and since the Lamia almost never uses this attack, you should control it.
The Fan Wizard has the White Wind Blue Magic in its arsenal. To acquire it, you will need to control the monster - keep this in mind for later when you are hurting as it's a cheap way to replenish lost HP's. The Fan Mage will drop a Dark Bow for you on occasion - a nice upgrade for your Hunter (you are still busy learning Sshot aren't you?).
The La Mage will drop an Elixir every now and then and you can steal a Poet Robe from him if you didn't purchase one in Jachol. The RonkaKnights are tough monsters to deal with as they have high defense all across the board; it takes patience to beat them.
Finally, deep in the maze, you may run into a Hyudra. These dragon type creatures are very powerful and can kill you if they really want to. The best way to kill them is to control them and then use their stong attacks against them. Don't cast any of those appealing attacks at your 'learning' character as much to everyone's dismay, you can't learn any of them. You can steal some Ether from them with ease after they are controlled.
Now that you are ready, head down from the entrance and go into the door. Loop around to the left and up and head down the stairs to reach the 2nd level (all the "levels" mentioned are basements: level 2 is basement 2). From here on out it might be a good idea to equip the Secret ability so that you can easily make out all of the paths. Head to the right over the secret paths, loop around to the bottom, and snag the Gold Armor waiting for you there. Head down the stairs in front of you to reach the 3rd level. Use the secret path on the left to cross over and then head up, using more secret paths to get at the Elixir. Head back down and then go up, around the perimeter of the room. Head past the two staircases to find another treasure: a Phoenix Down. From there, head down to the stairs at the bottom of the path to the right of the treasure chest that had the Phoenix Down in it. This will deliver you to a small room on the 4th level.
Go into the other stairs here to go back to the 3rd level, and head up from here to get at a nice Gold Shield. Now go all the way back to the treasure chest that had the Phoenix Down in it, and use the stairs to the immediate left. This will lead you to a nice Save Point. Use a Tent if you didn't rest after the Soul Gun fight. By now, you shouldn't worry about conserving Tents because of their relative cheapness (250gp). Head back out and then go up to those stairs in the pathway to the left. They will deliver you to the 4th level, and you should take the very next set of stairs. These stairs take you to the 3rd level. Take the next set of stairs. Back on the 4th level, take the next stairs. Finally, these stairs will lead you to the 5th level.
Head to the right and use the door to (guess what?) use some more stairs. Back on the 4th level, grab the Potion here, and then use the stairs. Don't worry about the door and the stairs behind them yet. On 5th level, use the next stairs. You should be back on the 4th level now, in a room filled with treasure. Be careful though, because there is a hole in the dead centre of the small room, and you'll fall down if you walk on top of it (remember that the Geomancer can help save you here). Collect the bounty by sticking to the edge of the room, and then fall down the hole on purpose. This will drop you back on the 5th level. Use those stairs. They will take you to familiar territory on the 4th level. Use that door I told to ignore earlier and then use the stairs behind them (the stairs farthest to the south).
Back to the 5th level, use those stairs. On the 4th level now, follow the path through the doors (3 of them) to reach some more stairs. Head up the stairs (don't go in the door yet) to find a save point on the 4th level. Save, rest, and stretch your legs. Head back to that door you passed up and head through it to some more stairs. Go through the door here on the 4th level and use the stairs, not the door. This will lead you to some treasure on the other side of a secret walkway. Snag it and then head back the way you came; back to that door you passed. Go down through the door and then hit the switch there. This will open up some more stairs for you. Take the stairs to the end of the maze.
When you get to the end of the labrynth, you will find King Tycoon and some green worm staring at each other (......). Reina and Faris try to talk to him, but he is distant and demands that we kill this beast blocking the way. You will get som wise counsel from Galuf about this beast's changeable weakness.
| BOSS 17: Archeoavis | Level | 21-22 |
|
After the Soul Gun fight, this should be a piece of cake for you! Still, this fight isn't anything to laugh at because of the boss' changeable elemental weakness you can't use magic to win this fight. However, the Skills (no matter which one) will still do good damage.
You may want to change your mages into Knights or Monks to be able to inflict good damage on the worm/thing. Do bring along a Blue Mage because you'll be using a Blue Magic in the fight. Archeoavis relies on strong attacks that target both the party and single members: don't take him lightly so make sure to use Cure2 liberally. When the battle begins, Archeoavis will be weak against wind, so use Aero2 on it, but after that, its weakness will be random. It is too much trouble to cast scan every other turn; this strategy is better, but not necessary. Once you inflict about 6000 points of damage on the worm/thing it will die, but then it will resurrect itself. King Tycoon is mighty impressed with the creature (just whose side is he on anyway?), but show it who's boss with a quick L5 Doom. You should get a Hero Drink for slaying Archeoavis. |
||
After winning the battle, King Tycoon will laugh in typical evil villian style (?!?), and head up. Follow him to find the Earth Crystal and King Tycoon staring at it. Bartz finally ventures a guess that something is controlling the King. He talks with Galuf, and the two decide to fight the King. Reina and Faris won't have it, though as they don't want Batz and Galuf to injure their father.
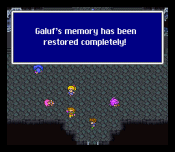
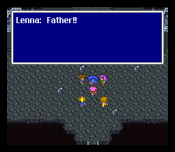
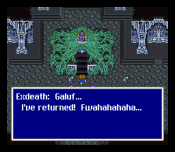 While the team argues, King Tycoon announces his intention to kill the whole team. Just when things seems to be going really awful, another meteor come crashing down and that same blonde haired girl from Galuf's memory bursts through the wall. Apparently, she came from the meteor. She casts some spell at the King and then sees Galuf, who she calls Grandpa. Seeing his granddaughter, Galuf can remember everything. King Tycoon comes to, and sees that his daughters are with him - the spell must've knocked some sense into him because he doesn't seem villanous anymore.
Bartz wanders over to the crystal to check on it, and issues an apt statement, "Oh crap!". The Earth Crystal shatters and the mighty Black mage, X-Death is free from his prison in the forest. He comes to the Earth Crystal room to throw his power around. He uses the power of the Earth Crystal shards to hurt Bartz. Then X-Death leaves to go and wreak havok on the Galuf's homeworld. King Tycoon doesn't want it to end this way, not after everything that has happened. He calls for the power of the Earth Crystal, but it is hard to control and the power lashes out at him. The king is determined, however, and ends up sacraficing himself so that the team can acquire the power of the crystal. A noble gesture.
After getting the crystal shards, the Ruins start to fall to the ground again. Remember that we're up in the air? Everyone, including the young Krile, manages to get to the Airship in enough time to escape. The Ruins crash down in the same spot from which it arose.
Earth Crystal Jobs: Samurai, Lancer, Dancer, Chemist
Know this about your new jobs, oh training warrior:
The Samurai are sort of like a combination between a Knight and a Ninja. They are able to equip the strong katana blades, and other stong armors, but are relatively slow. They are a nice upgrade for the character that has been focusing on building up stregth type job classes. The Samurai's default ability, $toss throws money at all of the enemies on the sceen to inflict massive damage. If you have extra money just flowing out of your pockets, then use this attack because it is quite powerful. Also like the Knight, the Samurai aren't very adept at magic usage, so give them another secondary ability that will up their damage potential, like 2-handed.
The Lancers are, by far, my personal favourite offensive class. The Lancers, of course, are able to use the Lance, or Polearm. They can also jump high in the air to inflict great damage on enemies when they pounce back down. While in the air, the enemy can't target you, so this, in itself, is a strategy you can work with. Even though they have access to most of the heavy armor, they are still moderately fast when compared to the Knight. The one downside to the Lancer is that they don't really have any useful abilities to learn, which means that you might want to build up the other jobs that do have those 'must-have' abilities first, and then equip them to the Lancer.
The Dancer is sort of like the Hunter in that it has some very useful abilities to learn, but isn't a very good fighting class. The Dance ability can be useful, but isn't very reliable (like Critter). The main objective for the Dancer is to learn the EqRibbon ability. This will allow any character to equip the powerful Ribbon item that will render you impervious to status ailments. You have to watch out for them, though, because the Dancer have the worst stamina rating of any class.
The Chemists are great characters to have! You can pretty much train a character in White Magic and then make them a Chemist with White for the rest of the game. The Chemist is able to reap a 2x effect out of the poiton, tonics, and ethers that you find or buy with Medicine, and this will help out a lot in tough battles. Later on, the Chemist will be able to use the Recvr ability, which is sort of like Esna, and the Rvive ability, which cures KO without the use of MP. This is great because you know how much Raise costs in terms of MP, and later on you'll get Arise which will set you back 50 MP. The Chemist is able to mix all of the those "useless" items (Dragon Fangs, Dark Matters, Turtle Shells) together with the everyday items (Tonics, Ethers, etc.) to make ultra powerful creations which can do almost anything that you can think of. This job is both extremely useful and fun to use: start learning those abilitites asap!